 Windows
 Mac OS X
 iPhone / iPad
 Android
 Other
Other
Choose your Program/Device
GTP Email Support - Pop Email on Samsung Galaxy tablet
Note!
Instructions with screenshots for setting up POP email on Samsung Galaxy Tablet
Pop Email on Samsung Galaxy Tablet
Note - we have take the below from this page but your settings are slightly different
Setup POP Mail Account - Samsung Galaxy Note 10.1
- Tap the Applications icon

- Tap Email

- Tap the Options icon

- Tap Settings

- Tap Add Account

- Tap the Email field
- Enter your email address
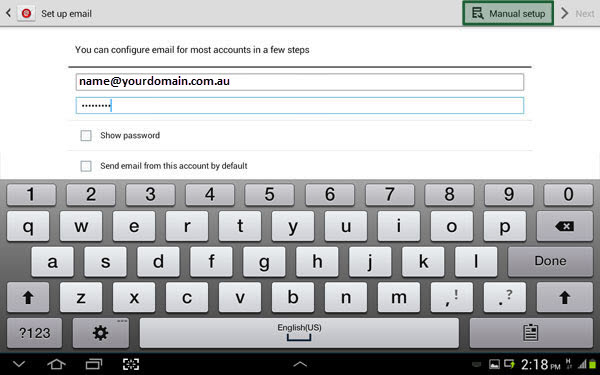
- Tap the Password field
- Enter your password details
- Tap Manual Setup
- Tap POP3 Account

- Tap the Username field
- Enter your username details
- Tap the Password field
- Enter your password details
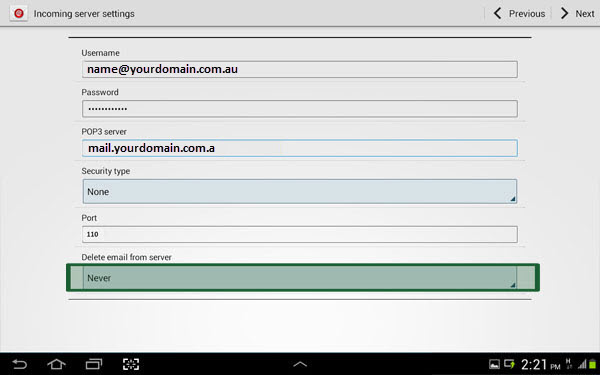
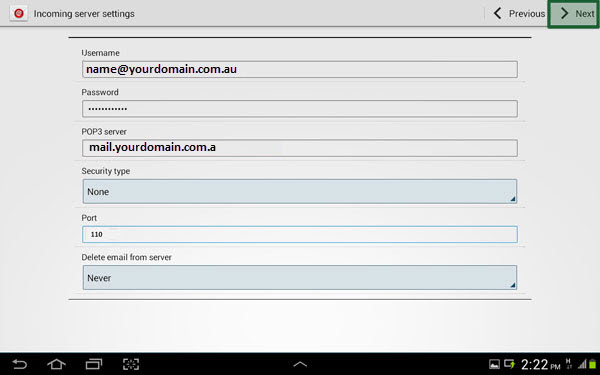
- Tap the POP3 Server field
- Enter mail.yourdomain.com.au (TIP: yourdomain should be replaced with your domain)
- Tap the Security Type field
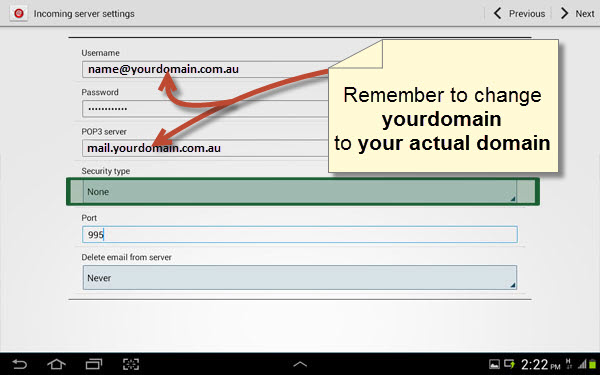
- Select the desired security type (i.e. None)

- Tap the Port field
- Enter in the port number 110
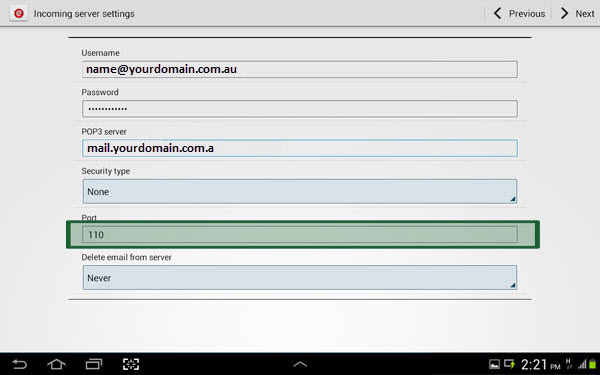
- Tap the Delete the Email from Server field
- Select the desired option (i.e. Never)
- Tap Next
- Tap the SMTP Server field
- Enter send.xtra.co.nz
- Tap the Security Type field
- Select the desired security type (i.e.None)

- Tap the Port field
- Enter in the port number 587
- Ensure Require Sign-In is ticked
- Tap the Username field
- Enter your username details
- Tap the Password field
- Enter your password details
- Tap Next
- Tap the Peak Schedule field
- Select the desired option (i.e. Never)

- Tap the Off-Peak Schedule field
- Select the desired option (i.e. Never)

- Tap the desired check boxes for required settings
- Tap Next

- Tap the Give this Account a Name (Optional) field
- Enter the name of the email provider (i.e. Yahoo!)
- Tap the Your Name field
- Enter in you full name
- Tap Done

- Your inbox is now setup for use
- Tap the Home key to return to the home screen

Was this information helpful?
These are the settings you want to enter.
Settings:
POP3 account
email: name@yourdomain.com
Incoming server
Username: name@yourdomain.com
POP3 server: mail.yourdomain.com
Security type: None
Port: 110
Delete email from server: Never
Outgoing server
SMTP server: mail.yourdomain.com
Security type: None
Port: 587
Username: name@yourdomain.com
Account Options
Peek Schedule: Never
Off-Peak schedule: Never
Tick the Synic Email box
Last updated: 2021-02-16 15:28:03